
Attach a backup as a second disk to recover selected files without replacing your server's current disks. Copy the files you need, unmount the backup and detach it when finished.
TABLE OF CONTENTS
- Applies to
- Before you begin
- Will my server restart?
- Attach the backup in mPanel
- Recover files on Linux
- Finish and detach on Linux
- Recover files on Windows
Applies to
Windows servers with an NTFS backup volume, or Linux servers with an ext4 backup partition. Use the section for your server's operating system.
Before you begin
You need a completed backup and administrator access to the server. The Linux example below uses Ubuntu 26.04 with an ext4 backup partition. Disk names and filesystems can differ; identify the backup before mounting it.
The attached backup can be larger than the server's live disk. You only need enough free space at the recovery destination for the files you copy. This applies to attaching a separate backup disk, not to restoring or cloning onto a smaller disk.
On Windows, open PowerShell as administrator and run Get-Disk before attaching the backup. Keep that disk list so you can identify the added disk afterwards.
Choose Attach, not Restore
Restore replaces the server's current disks. Attach makes the backup available alongside them for file recovery.
Will my server restart?
- Disk backups: Attaching or detaching a backup normally leaves your server running. If the disk cannot be connected or disconnected while the server is running, the operation shuts the server down and starts it again.
- ISO images: Attaching or detaching an ISO image requires a running server to shut down and start again.
A server that is already stopped is not started by attaching or detaching an image. If a server is suspended, detaching an image does not start it again.
The progress message
The progress window may show Restarting Server even when no restart occurs. That label alone does not mean your server has restarted.
Before detaching a backup, close files and applications using it. On Linux, unmount its filesystem first, as described below.
Attach the backup in mPanel
- Open your server in mPanel and select Backups > Manage.
- Select the backup by its date and label, then select Attach.
- Wait for attachment to complete. The page shows the attached backup and its expiry time.

Check the displayed expiry and finish copying before the backup is automatically detached.
Recover files on Linux
Connect to the server using SSH and identify the attached backup disk:
lsblk -o NAME,SIZE,TYPE,FSTYPE,RO,MOUNTPOINTSIn this example, the running system is on /dev/vda1 and the backup's ext4 filesystem is on /dev/vdb1. Do not assume those names apply to your server.
For this ext4 example, use an unused mount directory and mount without replaying the filesystem journal:
sudo mkdir -p /mnt/backup
sudo mount -o ro,noload /dev/vdb1 /mnt/backup
findmnt /mnt/backup
Check that the mount options include ro. Browse /mnt/backup and copy the required files to a separate recovery directory on your server. Check recovered files before replacing live application data.
The noload option is specific to filesystems such as ext4. It avoids journal writes but does not repair an inconsistent filesystem. Do not apply this example unchanged to XFS, LVM, encrypted volumes or another disk layout.
Finish and detach on Linux
Close files and leave any shell directory inside the backup, then unmount it:
cd ~
sudo umount /mnt/backup
If unmounting reports that the target is busy, close the process using it before continuing. Once unmounted, return to Backups > Manage and select Detach. Wait for completion.
Recover files on Windows
Connect to your Windows server and open PowerShell as administrator. Compare the disk list before and after attaching the backup to identify the added disk:
Get-Disk | Format-Table Number,Size,OperationalStatus,IsOffline,IsReadOnlyIn this Windows Server 2025 example, the live disk is disk 0 and the attached backup is disk 1. The backup is read-only but initially offline. Do not assume the disk numbers will be the same on your server.
Copy files to your server's live disk
The attached backup is read-only. Copy the files you need to a separate recovery folder on your server's live disk. Make sure it has enough free space for the files you want to recover.
If the identified backup disk is offline, bring only that disk online. Replace 1 below with its confirmed disk number:
Set-Disk -Number 1 -IsOffline $false
Get-Disk 1 | Format-List Number,OperationalStatus,IsReadOnly
Get-Volume | Format-Table DriveLetter,FileSystem,Size
Check that the backup is online. In this example, its NTFS volume has the drive letter D:. Use the letter shown on your server, not necessarily D:.
Open that drive in File Explorer and copy the required files to a separate recovery folder on your server's live disk with enough free space. Check the recovered files before replacing live application data.
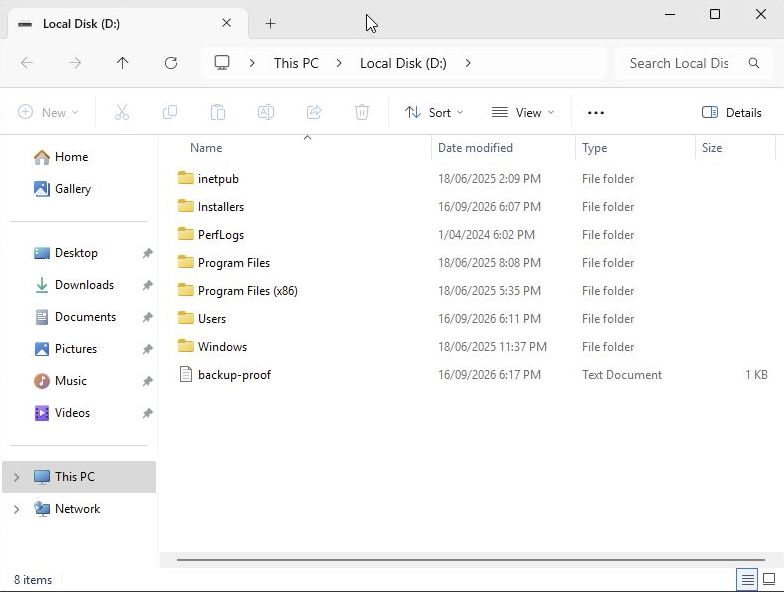
When finished, close files and Explorer windows using the backup. Return to Backups > Manage, select Detach and wait for completion. If the disk cannot be brought online or its files are unavailable, record the error and contact support.
To recover files on a separate Windows computer instead, download the backup and extract the required files.